

 
|

|
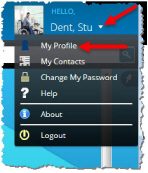
User Menu
In the upper-right corner of the Asset screen, click the arrow to the right of your user name to display the drop-down User menu. This menu enables you to perform tasks that are not application-specific. These are secondary tasks, such as accessing Help, or logging out of the application.

From this menu, you can
-
Update your My Profile information
-
Add your business contacts using the My Contacts function
-
Change your password
-
Access the Help system
-
View information about the system under the About Link
My Profile
Your profile is created by your System Administrator or your Application Administrator when you are added as a user. When your personal information changes, you need to update your Profile. You do not have permission to change most of the information in your profile, but you can update the following:
-
Your address
-
Your phone numbers
-
Your Avatar
-
Your Automated Clearing House (ACH) banking information
If you need additional information updated, such as your name changed due to marriage, etc., follow the procedures your organization has in place for requesting these changes.
Edit your Profile
If your address, phone number, or banking information changes, you need to update your Profile. If you decide that you would like to change your avatar, or the picture that represents your user profile, you can use this procedure to Upload an Avatar as well.
To edit your Profile:
-
Click the arrow next to your user name to display the User menu.
-
Click My Profile from the menu to display the My Profile panel.
-
Click one of the following tabs:
-
Addresses to update your address information
-
Phone Numbers to edit your phone number(s)
-
Avatar to Upload an Avatar
-
ACH to update your banking information
-
-
Make the necessary changes.
-
Click Save.
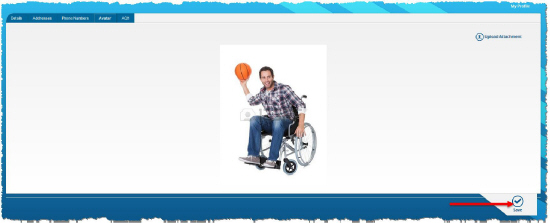
Upload an Avatar
An avatar is a picture or graphic used to represent you and distinguish yourself from other users of the application. You can only have one avatar linked to your user Profile. If you upload a new avatar, it overwrites the first file.
You can upload a graphic file with one of these extensions:
-
jpg
-
png
-
tif
-
bmp
-
gif
-
ico
You must log out, and then sign back in to the application before you can see the updated avatar. To upload an Avatar:
-
Click the arrow next to your user name to display the User menu.
-
Select My Profile from the menu to display the My Profile panel.
-
Click the Avatar tab. Your current avatar is displayed.
-
Click Upload Attachment. Your browser’s File Upload box is displayed.
-
Navigate to the file you want to use as your new avatar.
-
Click the file you want), and then click Open. Your new avatar is displayed.
-
Click Save.
-
Click Logout from the User menu.
-
Sign back in. The application refreshes and your new avatar is displayed alongside your user name.
![]()
My Contacts
The My Contacts feature enables you to enter the names and contact information for people with which you do business. In some Version 7 applications, you can select a contact name to attach it to a record. In other Version 7 applications, you use this feature to keep your contact information in one place, like you organize your contacts on your smartphone or email application.
On the My Contacts screen, you can:
Search for a Contact
You can search for your contacts when you want to view or edit contact information. For more information about searches Version 7 applications, please see Data Searches.
To search for a contact:
-
Click the arrow next to your user name to display the User menu.
-
Select My Contacts from the menu to display the My Contacts panes.
-
Type your criteria in the Search field or one or more of the filtering fields, or leave all fields empty for a non-filtered search.
-
Click Search to display the results list.
-
Click the contact name in the search results to display the contact details.
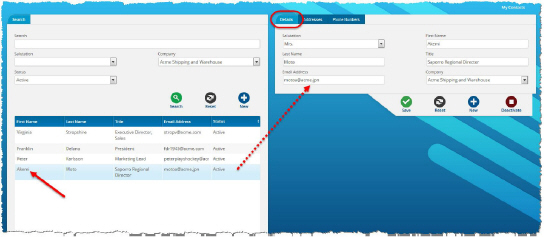
You can then view all information for the contact in the Details, Addresses, or Phone Number tabs.
Edit a Contact
If your contact’s information changes, you can edit the contact information to update it with the new information. To edit a contact:
-
Select the contact name from the search results to edit.
-
Make any necessary changes, such as adding an address.
-
Click Save.
Add a Contact
When you have new business contacts, you can add them to your contact list so they are easy to locate. To add a contact:
-
Click the arrow next to your user name to display the User menu.
-
Select My Contacts from the menu to display the My Contacts panes.
-
In the Search pane, click New.
-
Click the Details tab on the right hand pane and fill it in.
-
Click the Addresses tab.
-
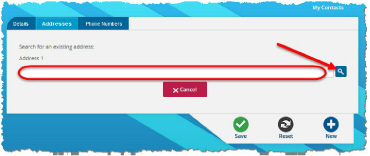
Click the + in the lower-left corner of the pane. The Addresses tab displays in search mode.
-
Type into the search field, or leave it blank. Then click the search button at the end of the field. Leaving the field blank will return a non-filtered list of all contact addresses.
-
Click one of the addresses in the search results list, and then click Select to link it to your new contact, or click Add New to create another address for your new contact.
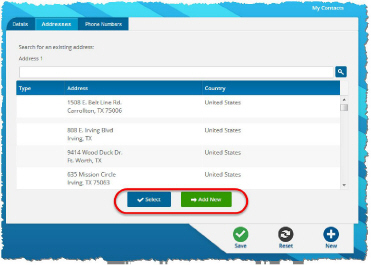
-
If you select an existing address and click Select, then click Save.
-
If you click Add New, fill in the details, and then click Add to Addresses.
-
Click Save.
-
Click the Phone Numbers tab, and then click the + in the lower left corner of the pane.
-
Complete the Type, Phone Number and Extension fields, and then click Save.
Deactivate a Contact
You may want to deactivate a contact if they leave your organization or the organization with which you do business. If your contact comes back to your organization or another organization you work with, you can easily Reactivate a Contact without having to re-enter all of the information. To deactivate a contact:
-
Select the contact name from the search results to deactivate.
-
Click Deactivate. The Confirm Deactivation box is displayed.
-
Click Yes. The contact is deactivated, and the status is set to Inactive.

Reactivate a Contact
If you do business with a deactivated contact again, you can reactivate the contact. Deactivating is not deleting. To reactivate a contact:
-
Search for a Contact. For filtered results, set the Status to Inactive.
-
Select the contact from the search results to reactivate.
-
Click Reactivate. The contact is reactivated, and the status is set to Active.

Change My Password

For more information about logging into the system and changing your password, please see Signing In to the Application.
Help

The Help link on the User menu takes you to the Apptricity Online Help site in your browser.
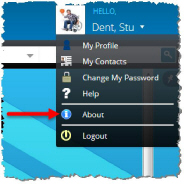
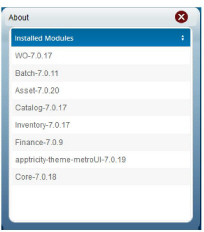
About Link
The information in the About box displays all installed modules that are included in your version of the application. You may be asked to provide this information if you contact Technical Support.
To display the About box:
-
Click the arrow next to your user name to display the User menu.
-
Select About from the menu.
The About box is displayed, with installed module and version information. All details that appear in the About box are important. Apptricity applications comprise several layers, and each layer may include differing version information. This version information is useful to administrators and customer support.
Log Out of the Application
You log out of the application through the User menu. You should log out of the application at the end of your business day for security purposes.
If you forget to logout, the application automatically times out and logs you out after a specified time. Your organization will determine the length of the period required before you are automatically logged out of the application. To log out of the application:
-
Click the arrow next to your user name to display the User menu.
-
Click Logout from the menu to log out of the application.